Setup
Fluid Frenzy is easy and quick to set up ready for use with just a few clicks. To set up a scene to use Fluid Frenzy follow the steps below: *Note that Fluid Frenzy has two Fluid Simulation methods called Flux and Flow and the is the users choice which version they wish to use.
Simulation Time Step
The fluid simulation always advances in small, fixed steps of 60 per second (one step every 0.01667 seconds). This keeps the water stable. Your game’s frame rate can be higher or lower. The simulation will skip or repeat steps as needed to stay on that 60 Hz clock.
By default, the simulation is tied to Unity’s Fixed Timestep setting (Edit → Project Settings → Time). Unity’s default is 0.02 (50 updates per second). If that value does not match the simulation’s 60 Hz rate, the water can look choppy or fall behind real time.
Recommended: Set Fixed Timestep to 0.0166667 in Project Settings → Time. Use this when your whole project can run physics at 60 Hz. It is the simplest setup and keeps the simulation in sync with Unity physics.
If you need a different Fixed Timestep (for example 0.02 because the rest of your game already relies on it): add the scripting define symbol FLUIDFRENZY_RUN_UPDATE. Go to Edit → Project Settings → Player → Other Settings → Scripting Define Symbols, add FLUIDFRENZY_RUN_UPDATE, and apply. The fluid simulation will then update on the normal render loop instead of Fixed Update, so it keeps its own 60 Hz clock without changing your physics settings.
Water Simulation
These steps will describe how to set up a fluid simulation that will simulate and render water.
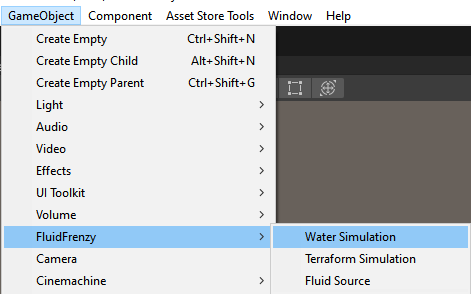
- (Optional) Select the Terrain you want to fluid simulation to interact with.
- Add a Fluid Simulation by clicking the GameObject menu and selecting
Fluid Frenzy > Flux > Create Water SimulationorFluid Frenzy > Flow > Create Water Simulation. - You should now have a GameObject in your Scene Hierarchy named WaterSimulation with 4 Components:
- Fluid Simulation
- Foam Layer
- Fluid Flow Mapping
- Water Surface
- If you followed step 1 go to step 5. The Terrain and its settings have been automatically assigned to the Fluid Simulation Component. If you did not follow step 1 you will have to assign the following fields:
- Dimension: The size of your simulation/terrain domain.
- Terrain Type: Unity Terrain, Heightmap, Simple Terrain which specifies the type of terrain you wish to use.
- Terrain/Simple Terrain/Heightmap: The object you want the Fluid Simulation to interact with.
- For indoor pools and custom mesh environments see Layer Capture Simulation.
- Fluid settings, assets, and materials are automatically created in the folder of your scene. You can tweak these values to your liking.
- Add a Fluid Modifier Volume by clicking the GameObject menu and selecting
Fluid Frenzy > Fluid Source. - Setup the new Fluid Modifier by placing it in the desired location in the scene and setting up the settings in the Inspector
You now have a functional Fluid Simulation using Fluid Frenzy. Use Edit Mode Preview in the Scene view, or hit Play, and see your Terrain being flooded by water!
Terraform Simulation
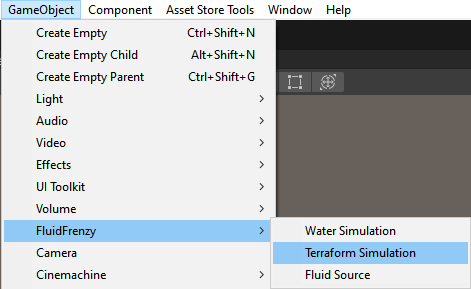
These steps will describe how to set up a fluid simulation that will simulate god game-like terraforming. The simulation supports fluids of water and lava, erosion and fluid mixing to turn water and lava into rock. In the current version of Fluid Frenzy terraforming only works the Terraform Terrain.
- Add a Terraform Terrain to your scene by clicking the GameObject menu and selecting
Fluid Frenzy > Terraform Terrain. - Set up your Terraform Terrain by assigning all required settings.
- Set up the newly created Terraform Terrain to your liking.
- Select your Terraform Terrain and add a Terraform Simulation by clicking
Fluid Frenzy > Flux > Terraform SimulationorFluid Frenzy > Flow > Terraform Simulation. - Fluid settings, assets, and materials are automatically created in the folder of your scene. You can tweak these values to your liking.
- Add a Fluid Modifier Volume by clicking the GameObject menu and selecting
Fluid Frenzy > Fluid Source. - Set up the new Fluid Modifier by placing it in the desired location in the scene and setting up the settings in the Inspector. You can change the layer to control which fluid the modifier should add to. Layer 1 is Water while Layer 2 is Lava.
Optional: enable eight-layer terrain if you need more than four stacked height layers. On the Erosion Layer or Terraform Layer, enable Tint Water if carried sediment should stain the water. Set Sediment Transport to Conservative Flux on a Flux simulation when you want mass-conserving sediment movement on closed borders.
You now have a functional Terraform Simulation using Fluid Frenzy. Use Edit Mode Preview in the Scene view, or hit Play, and see your Terrain being filled with water and lava!
Layer Capture Simulation
These steps will describe how to set up a fluid simulation that uses scene meshes as the ground instead of a Unity Terrain. This is the method used by the Pool sample. Use it for indoor pools and other environments that are built from regular GameObjects.
The simulation captures a top-down orthographic heightmap of the objects on the Unity Layers you pick. Those objects become the floor and walls the fluid sits on.
- Put the meshes you want the fluid to sit on (pool floor, walls, rocks) on a dedicated Unity Layer. Do not put the water renderer on that same layer.
- Add a Fluid Simulation by clicking the GameObject menu and selecting
Fluid Frenzy > Flux > Create Water SimulationorFluid Frenzy > Flow > Create Water Simulation. Do not select a Terrain first. - You should now have a GameObject in your Scene Hierarchy named WaterSimulation with 4 Components:
- Fluid Simulation
- Foam Layer
- Fluid Flow Mapping
- Water Surface
- Move the WaterSimulation to the lowest point of your pool. Set Dimension so the domain covers the area you want filled.
- On the Fluid Simulation component set the following:
- Terrain Type: Layers
- Capture Layers: the Unity Layer from step 1
- Capture Height: high enough to include the top of the walls. The capture starts at the simulation object’s Y position and goes up by this amount.
- Set every boundary side to Closed so the water stays in the pool instead of flowing out of the domain.
- Set Initial Fluid Height to the world Y you want the water surface to start at. Geometry below that height will be submerged. You can also add a Fluid Modifier Volume with
Fluid Frenzy > Fluid Sourceif you want the pool to fill over time instead. - Fluid settings, assets, and materials are automatically created in the folder of your scene. You can tweak these values to your liking.
Enable Update Ground Every Frame only if the captured meshes move or deform during play. Leave it off for a static pool.
Note: Do not include the Water layer in Capture Layers. The water surface would be captured as ground.
You now have a functional Fluid Simulation using scene geometry instead of a Terrain. Use Edit Mode Preview in the Scene view, or hit Play, and see the pool fill. The Pool sample is a complete example of this setup with underwater rendering, caustics, buoyancy, and a Fluid Event Trigger.
If you only have a single static mesh you can set Terrain Type to Mesh Collider and assign that collider instead of using Layers. See Physics Colliders for obstacles, walking on the water, and buoyancy.
Simulation Regions
As of version 1.2.1 a simulation does not need to match the exact size of the Unity Terrain and can be smaller to cover only a select region by setting a smaller Dimension and moving the simulation to the desired location.
The simulation can also be non-square by setting the Number Of Cells of the Fluid Simulation Settings to a non-square size. It is recommended to set the Dimension Mode to CellSize and scale the dimensions of the fluid simulation using World Space Cell Size of the Fluid Simulation. This will help the simulation run at a constant speed in both directions as it will maintain the correct aspect ratio.
Note: Mixing square and non-square dimensions and Number Of Cells is possible but not recommended as the aspect ratio correction code might not match at all configurations.
Note: Non square simulation regions are currently only officially supported on the Unity Terrain mode of the fluid simulation, support for other modes is not guaranteed but will be added in the future.
Fluid Channels
Fluid channels are bitmask tags, similar to Unity layers, that identify what kind of fluid a simulation represents and which Fluid World Renderer should include it.
Configure the display names at Edit → Project Settings → Fluid Frenzy → Channels. Names are stored in Fluid Frenzy Settings (Assets/FluidFrenzy/Resources/FluidFrenzySettings.asset) so they are available at runtime and in builds.
Each Fluid Simulation and Fluid World Renderer exposes a Fluid Channels mask. A simulation is included in the composited world surface when (renderer mask & simulation.fluidChannels) != 0. Use ~0 on both sides to include all channels, or assign disjoint masks so separate world renderers draw water, lava, or other fluid types independently.
New projects start with these default names for the first five bits:
| Bit | Default name |
|---|---|
| 0 | Default |
| 1 | River |
| 2 | Ocean |
| 3 | Lake |
| 4 | Lava |
Bits 5–31 default to Channel N until renamed. Up to 32 channels are supported.
Shader Stripper
Fluid Frenzy strips unused shader variants from its water, lava, terraform, and prepass shaders during player builds. This reduces build size and shader load time. The build callback lives in FluidFrenzyShaderStripper; project toggles live under Edit → Project Settings → Fluid Frenzy → Shader Stripper and are stored in ProjectSettings/Packages/com.frenzybyte.fluidfrenzy/FluidFrenzyShaderStripperSettings.asset.
Only the active render pipeline subshader is kept for each FluidFrenzy shader (HDRP, URP, or Built-in, depending on project defines). Additional variants are removed automatically (for example incompatible instancing combinations, unused fog keywords, and WebGL GPULOD limits).
Use Auto Optimize to scan enabled build scenes and FluidFrenzy materials, then enable only the keyword combinations your project needs. Use Enable All to reset every toggle before testing a smaller strip profile.
GPULOD
| Property | Description |
|---|---|
| Fluid Frenzy Instancing | Keep GPULOD / Fluid Frenzy instancing shader variants. Used by Fluid Renderer and Fluid World Renderer when render mode is GPULOD. |
| World Atlas | Keep world-atlas shader variants. Requires Fluid Frenzy Instancing. Used by Fluid World Renderer. |
Displacement Waves
| Property | Description |
|---|---|
| 2D Waves | Keep 2D detail-wave displacement variants. Used when Detail Wave Settings use baked, dynamic, or non-flipbook modes. |
| Flipbook Array | Keep flipbook detail-wave displacement variants. Used when Detail Wave Settings animation mode is Flipbook. |
Flow Mapping
| Property | Description |
|---|---|
| Off | Keep flow-mapping variants with flow disabled. Used when Fluid Flow Mapping is off or missing. |
| Static Fast | Keep static-fast flow-mapping variants. |
| Static | Keep static flow-mapping variants. |
| Dynamic | Keep dynamic flow-mapping variants. |
Ocean FFT Cascades
| Property | Description |
|---|---|
| Off | Keep ocean FFT disabled variants. Used on tile Fluid Renderer surfaces and when Fluid World Renderer has Ocean Fft Enabled off. |
| Cascade 1 | Keep ocean FFT cascade 1 variants. |
| Cascade 2 | Keep ocean FFT cascade 2 variants. |
| Cascade 3 | Keep ocean FFT cascade 3 variants. |
| Cascade 4 | Keep ocean FFT cascade 4 variants. |
Sampling
| Property | Description |
|---|---|
| Non-Tiled Sampling | Keep non-tiled fluid sampling variants. |
| World UV Space | Keep world UV space variants. |
Universal Render Pipeline
Fluid Frenzy supports seamless integrating with Unity’s Universal Render Pipeline. Almost all simulation and rendering components are interchangeable between Built-in and URP without having to assign new shaders or materials. The following features require configuration changes of the Universal Render Pipeline Asset.
-
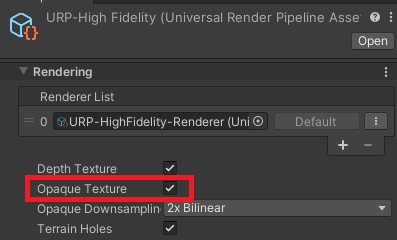
Screenspace Refraction
When Screenspace Refraction is enabled on the FluidFrenzy/Water shader/material URP requires the following setting to be enabled:
High-Definition Render Pipeline
Fluid Frenzy support for HDRP requires different shaders on most materials. This is due to Unity recommending the use of ShaderGraph to create custom shaders for future compatibility with newer features. The one exception for this is the FluidFrenzy/Water shader, which is interchangeable with URP and Built-in. The table below will show which shader to use for which rendering feature.
| Feature | Built-in | Universal Render Pipeline (URP) | High Definition Render Pipeline (HDRP) |
|---|---|---|---|
| WaterSurface | FluidFrenzy/Water | FluidFrenzy/Water | FluidFrenzy/Water |
| WaterSurfaceHDRP | N/A | N/A | FluidFrenzy/HDRP/WaterSurfaceHDRP |
| LavaSurface | FluidFrenzy/Lava | FluidFrenzy/Lava | FluidFrenzy/HDRP/Lava |
| TerraformTerrain | Fluidfrenzy/TerraformTerrain | Fluidfrenzy/TerraformTerrain | FluidFrenzy/HDRP/TerraformTerrain |
| FluidParticleGenerator | FluidFrenzy/ProceduralParticle (or Unlit) | FluidFrenzy/ProceduralParticle (or Unlit) | FluidFrenzy/HDRP/ProceduralParticle (or Unlit) |